

- Storyboarding Basics: Understanding the Plot for Motion Graphics Storyboard

- Character Design for Storyboarding
- Incorporating Dialogue and Narration in Storyboards for Motion Graphics
- Storyboarding Tools and Techniques for Motion Graphics
- Step-by-Step Guide on Creating a Storyboard for Motion Graphics
- Avoiding Common Storyboarding Mistakes
- Choosing the Right Storyboarding Software for Motion Graphics
Introduction to Motion Graphic Storyboard Creation
Storyboarding plays a pivotal role in the pre-production process of motion graphics, serving as a visual blueprint that guides the entire project. It allows creators to visualize the storyline, streamline the production process, and direct post-production effectively. This guide provides an in-depth look at creating a motion graphics storyboard, its benefits, and how to master its techniques.
Storyboard software for video agencies & brand teams
One workspace for storyboards, animatics, comments, and approvals. Spend time on the creative, not the back-and-forth.

Storyboarding Basics: Understanding the Plot for Motion Graphics Storyboard
Before you begin sketching your storyboard, it's crucial to have a deep understanding of the plot. This is the foundation upon which your storyboard will be built. Without a clear grasp of the storyline, you risk creating a disjointed and confusing storyboard.
The plot refers to the sequence of events that make up your story. It includes the introduction, conflict, climax, and resolution. Each event in the plot pushes the story forward and influences the subsequent events. In the context of motion graphics, the plot is the narrative or message you want to convey through your animation.
Characters
Characters are the heart of any story. They drive the plot and engage the audience. Therefore, it's essential to know your characters inside and out. Consider their physical attributes, personality traits, motivations, and how they interact with other characters. This will help you portray them accurately on your storyboard.
Settings
The setting of your story is the environment where events take place. It includes the location, time, and atmosphere. Understanding the setting will help you create accurate and immersive backgrounds for your scenes.
Sequence of Events
The sequence of events is the order in which things happen in your story. It's the path that your characters follow from the beginning to the end of the story. Understanding the sequence of events will guide you in arranging your scenes in the right order.
Character Design for Storyboarding
Character design is a crucial aspect of storyboarding for motion graphics. It involves defining the physical attributes, expressions, and movements of your characters. This is essential because characters are the driving force of your story, and their design can significantly influence the audience 's perception and emotional connection with your narrative.
Physical Attributes: In motion graphics storyboarding, it's important to keep the design of your characters simple and clear. This is because the characters will be animated, and overly complex designs can be difficult to animate effectively. Use basic shapes to create the structure of your characters, and then add details to make them unique.
Expressions: In the context of motion graphics, expressions are often exaggerated to make them more noticeable and impactful. This involves emphasizing key features such as the eyes, eyebrows, and mouth. For example, a surprised character might have wide-open eyes and a dropped jaw, while an angry character might have narrowed eyes and a frowning mouth.
Movements: The movements of your characters should be fluid and natural. They should also be consistent with the character's personality and emotions. For example, a nervous character might have quick, jittery movements, while a confident character might move in a slow and steady manner.
To depict camera movement in your storyboard, you can use arrows and lines. For instance, an arrow can indicate the direction of a character's movement, while a line can represent the path they follow.Consistency: Consistency is key in character design for motion graphics storyboarding. Your characters should maintain their physical attributes, expressions, and movements throughout the storyboard. This will ensure that your characters are recognizable and relatable to the audience.
Incorporating Dialogue and Narration in Storyboards for Motion Graphics
Incorporating dialogue and narration into your storyboard is a crucial step in the process of creating effective motion graphics. This is because dialogue and narration can greatly enhance the narrative flow and emotional impact of your animation.
Dialogue in Storyboards
 Adding dialogue in Boords.
When incorporating dialogue into your storyboard, consider the following tips:
Keep It Short: Aim for short, snappy lines of dialogue that convey essential information or emotion. This keeps the audience engaged and ensures the dialogue doesn't overshadow the visuals.
Use Clear Fonts: Choose a clear, easy-to-read font for your dialogue. This ensures that the audience can easily read and understand the dialogue, even when the storyboard is viewed at a smaller size.
Position Carefully: Position the dialogue in a way that doesn't obstruct important visual elements in the scene. The dialogue should complement the visuals, not distract from them.
Narration in Storyboards
When incorporating narration into your storyboard, consider the following tips:
Use Sparingly: Only use narration when necessary to provide crucial information or context that can't be conveyed through visuals or dialogue. Too much narration can make your motion graphics feel like a radio play.
Align with Visuals: Ensure that the narration aligns with the visuals in each scene. The narration should enhance the visuals, not contradict them.
Consider Timing: Keep in mind the timing of the narration. It should not rush the viewer or leave them waiting for the next visual cue.
In motion graphics storyboarding, dialogue and narration play a unique role compared to other mediums. While in film or theatre, actors use their voices and physical presence to convey emotion and information, in motion graphics, the visuals, dialogue, and narration must work together to tell the story. Therefore, it's crucial to use dialogue and narration effectively to create a balanced and engaging visual narrative.
Storyboarding Tools and Techniques for Motion Graphics
Storyboarding for motion graphics requires a unique set of tools and techniques. Unlike traditional storyboarding mediums where static images are used, motion graphics storyboarding involves creating a sequence of events that depict movement, transitions, and timing.
Drawing Tools
The first step in storyboarding is sketching out your ideas. You can start with simple pencil and paper, but many professionals prefer using digital tools for their flexibility and convenience.
For digital sketching, you can use graphic tablets like Wacom or iPad Pro with Apple Pencil. These devices offer pressure sensitivity and precision, making it easier to create detailed drawings. Software like Adobe Photoshop, Illustrator, or Procreate are commonly used for sketching and coloring.
Storyboarding Software
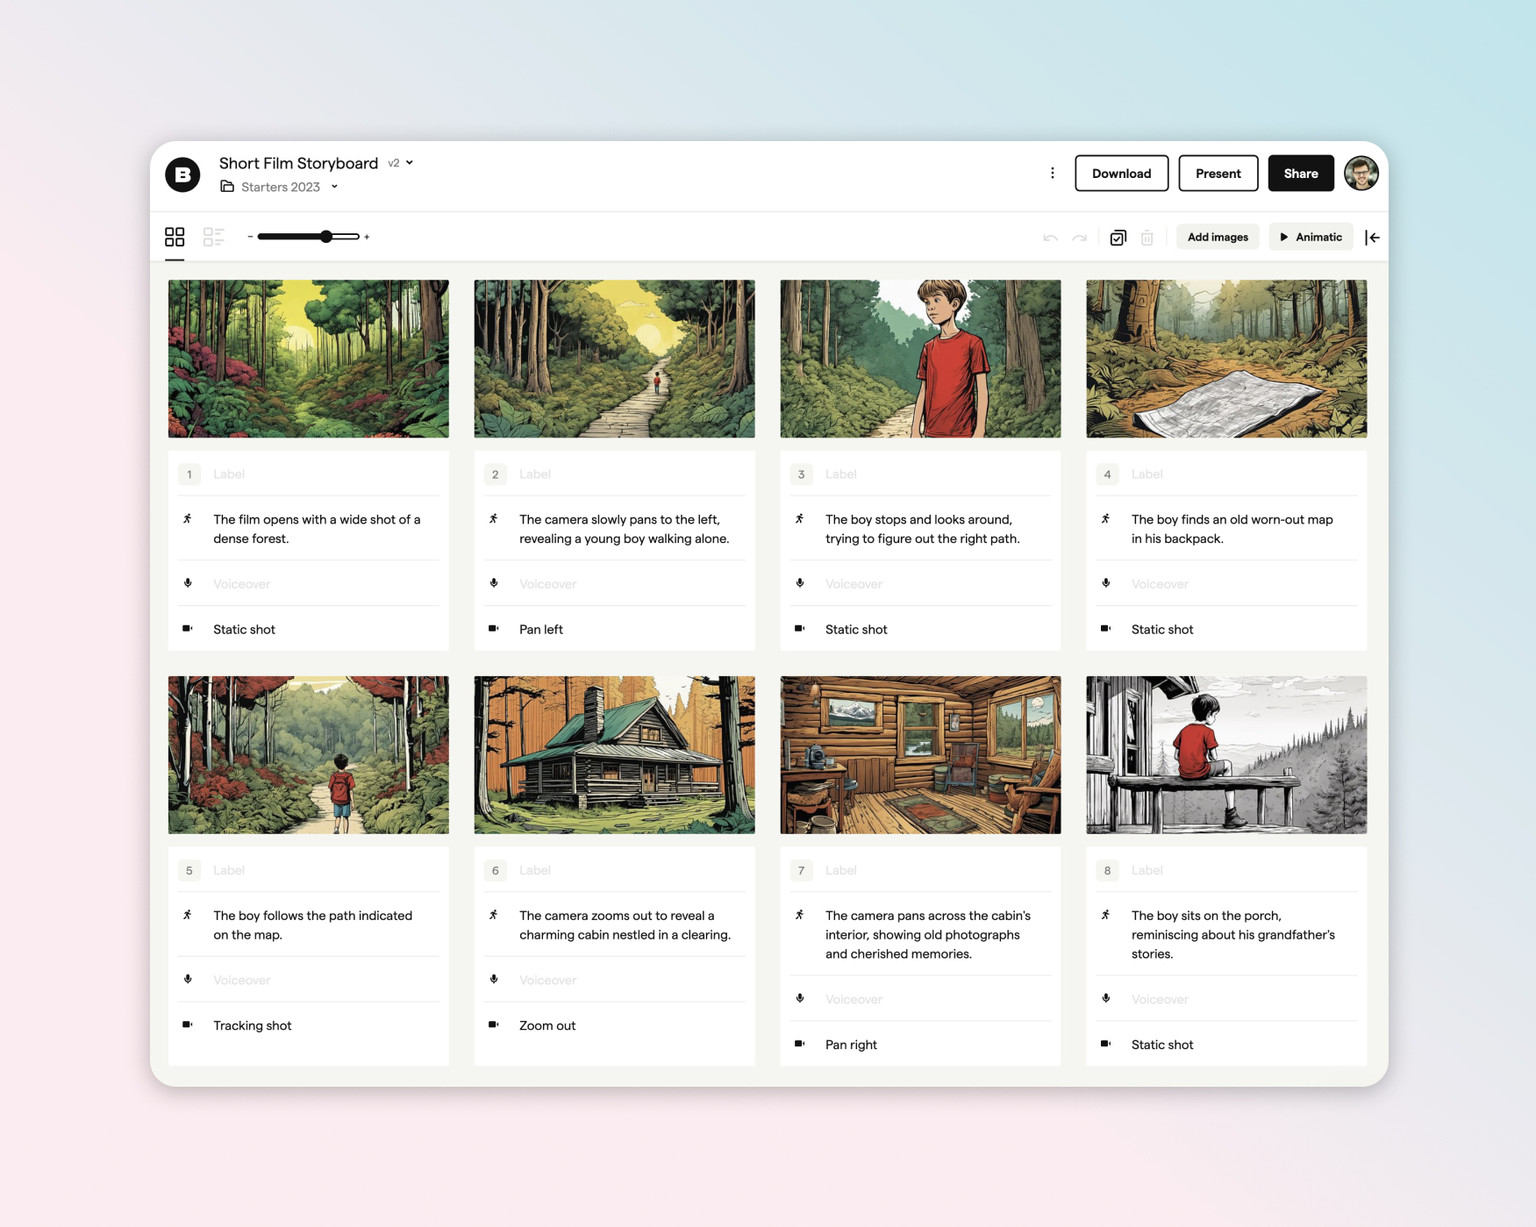
 Boords makes it easy to create effective motion graphics storyboards.
Storyboarding software allows you to create, edit, and arrange your sketches into a sequential storyboard. They often come with features like drag-and-drop interfaces, customizable templates, and collaboration tools.
For motion graphics storyboarding, software like Boords is a popular choice. Tools like Boords allow you to add timing, transitions, and even basic animations to your storyboard.
In particular, Boords offers a user-friendly interface and a wide range of features including animatic creation, AI image generation, character libraries, and feedback tools. This makes it an excellent choice for beginners and professionals alike.
Depicting Movement
 Adding camera move indicators in Boords.
Arrows are a simple and effective way to indicate movement. You can also use multiple frames to show a sequence of movements, or use ghosting (drawing slightly transparent images) to show the path of motion.
For more complex movements, you might consider creating an animatic - a rough animation with basic movements and timing. Many storyboarding software, including Boords, offer animatic creation tools.
Depicting Emotion
When sketching characters, pay attention to their facial expressions and body language. Use color to set the mood of your scenes - for instance, warm colors like red and yellow can convey excitement or happiness, while cool colors like blue and green can convey calmness or sadness.
The composition of your scenes can also influence the emotional impact. For instance, a character placed in the center of the frame can appear more important or dominant, while a character placed off to the side can appear less significant.
Timing and Transitions
In motion graphics, timing and transitions are key. Your storyboard should indicate the duration of each scene and the transitions between them. The Animatic Tool feature in Boords allows you to export scripts, record voiceovers, match them to your storyboard, and upload the voiceover to the animatic, enabling precise timing of your storyboard to the voiceover.
Also, storyboarding software like Boords allows you to add timing information to each frame. You can also use arrows to indicate camera movement.
Remember, the goal of your storyboard is to guide the creation of your motion graphics. By using the right tools and techniques, you can create a clear and effective visual blueprint for your project.
Step-by-Step Guide on Creating a Storyboard for Motion Graphics
Creating a storyboard for motion graphics is a systematic process that requires attention to detail, creativity, and strategic planning. Using a specialized storyboarding software like Boords can streamline this process, providing you with all the necessary tools to create an organized and visually compelling storyboard. Here's a step-by-step guide on how to use Boords for your motion graphics storyboard.
Step 1: Understanding the Story
Before you begin storyboarding, it's crucial to have a thorough understanding of your story or message. This involves understanding the characters, settings, sequence of events, and the overall narrative arc. This step is particularly important in motion graphics storyboarding as the visuals, dialogue, and narration must work together to effectively convey the story.
Step 2: Initial Sketching
Once you have a clear grasp of the story, you can begin sketching your scenes using Boords. Start by creating a new storyboard and adding frames for each scene. Use the drawing tools to sketch the basic elements of each scene, including characters, backgrounds, and objects. At this stage, focus on getting your ideas down rather than creating detailed drawings.
Step 3: Adding Details
After sketching the basic elements, you can start adding more details to your scenes. This includes refining character designs, adding expressions, and enhancing the backgrounds. Use the color tools in Boords to add depth and mood to your scenes. Remember to depict movement using arrows or ghosting, as movement is a key aspect of motion graphics.
Step 4: Timing Each Scene
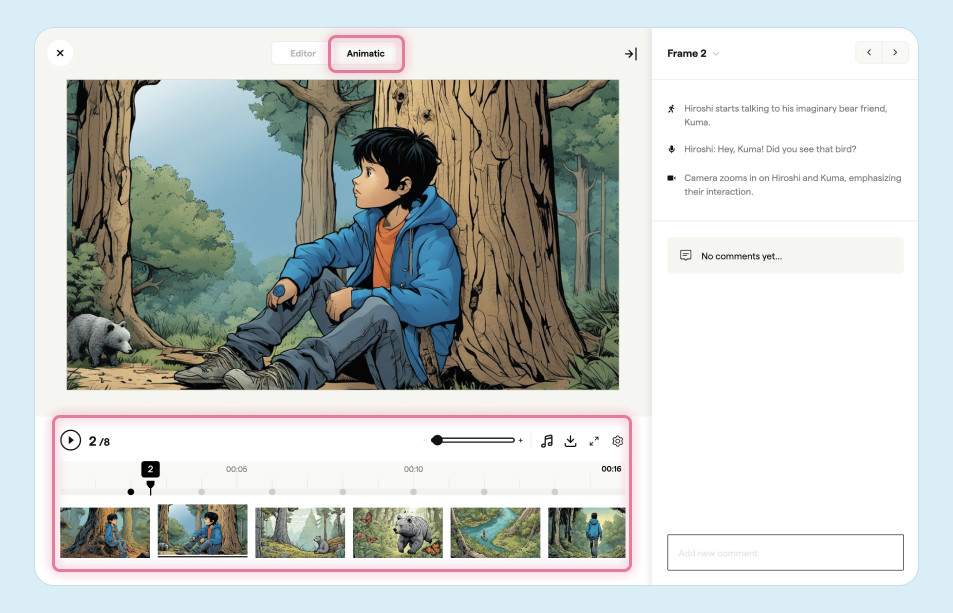 Using the automatic Animatic Tool in Boords.
Next, determine the duration for each scene. In Boords, you can add timing information to each frame, indicating how long it should last in the final animation. This is crucial in motion graphics storyboarding as it helps to establish the pace of the story and ensures smooth transitions between scenes.
Step 5: Collaborating and Receiving Feedback
 Share storyboards & animatics for feedback.
Boords allows you to share your storyboard with others, making it easy to receive feedback. Invite your team members or client to view the storyboard and provide their input. Incorporate their feedback into your storyboard to ensure it aligns with everyone's vision.
Step 6: Finalizing the Storyboard
Once you've incorporated all feedback, it's time to finalize your storyboard. Review each scene for consistency and accuracy. Ensure that the storyboard effectively communicates the story and that all movements and transitions are clear.
Step 7: Translating the Storyboard into Animation
Finally, use your completed storyboard as a guide during the animation process. The storyboard serves as a visual blueprint, helping you to maintain consistency and stay true to your original vision. With Boords, you can easily refer back to your storyboard at any stage of the animation process.
Avoiding Common Storyboarding Mistakes
Storyboarding for motion graphics is a complex process that requires careful planning and execution. However, even the most experienced storyboard creators can fall into common pitfalls. Here are some common mistakes often made in storyboarding for motion graphics and how you can avoid them.
1. Overcomplicating the Story
One common mistake is overcomplicating the story. In motion graphics, the visuals, dialogue, and narration must work together to tell the story. If your plot is too complex, it can be challenging to convey it effectively through these elements.
To avoid this, keep your story simple and straightforward. Focus on one main idea or message and build your storyboard around it. Use clear and concise dialogue and narration to support your visuals, not to add unnecessary complexity.
2. Neglecting the Timing
Another common mistake is neglecting the timing. In motion graphics, timing is crucial. It determines the pace of the story and the transitions between scenes. If your timing is off, it can disrupt the flow of your animation and confuse your audience.
To avoid this, always include timing information in your storyboard. Determine the duration of each scene and the transitions between them. Use storyboard software like Boords, which allows you to add timing information to each frame.
3. Inconsistent Character Design
Inconsistent character design is another common pitfall. In motion graphics, characters are the driving force of the story. If your characters' physical attributes, expressions, or movements are inconsistent, it can confuse your audience and weaken their connection with your characters.
To avoid this, maintain consistency in your character design. Make sure your characters maintain their physical attributes, expressions, and movements throughout the storyboard. Use basic shapes and clear lines to create your characters, and add details consistently to make them unique.
4. Not Depicting Movement Clearly
 An example of a pan transition.
Not depicting movement clearly is a common mistake in motion graphics storyboarding. Since your final product will be animated, your storyboard needs to clearly communicate how elements in your scenes move and change over time.
To avoid this, use arrows, ghosting, or multiple frames to indicate movement. For complex camera movements, consider creating an animatic - a rough animation with basic movements and timing. This can help you and your team visualize the movement more effectively. Pro-tip: you can create an animatic from your storyboard automatically in Boords.
Choosing the Right Storyboarding Software for Motion Graphics: Boords
When it comes to storyboarding for motion graphics, choosing the right software can make all the difference. A good storyboard software should offer a range of features that simplify the process, promote organization, and enhance visual communication. One such software that stands out in these areas is Boords.
Boords is a web-based storyboarding software designed to help creators visualize their stories effectively. It offers a range of features that make it an excellent choice for motion graphics storyboarding.
1. Easy-to-Use Interface
Boords has an intuitive interface that makes it easy even for beginners to get started. It simplifies the process of creating and managing storyboards, allowing you to focus more on the creative aspects of your project.
2. Comprehensive Drawing Tools
Boords provides a variety of drawing tools that allow you to sketch and detail your scenes directly within the software, as well as AI image generation, icon & stock photo libraries, and more.
This is particularly useful in motion graphics storyboarding, where visual clarity is crucial. You can sketch characters, backgrounds, objects, and depict movement using arrows or ghosting.
3. Animatic Feature
The animatic tool.
In motion graphics, timing is everything. Boords allows you to add timing information to each frame and create animatics, helping you establish the pace of your story and ensure smooth transitions between scenes.
4. Collaboration and Feedback
Collaboration is a key part of the storyboarding process. Boords makes it easy to share your storyboard with team members or clients and receive their feedback directly on the platform. This promotes effective communication and ensures everyone is on the same page.
5. Easy Reference during Animation
Boords serves as a visual guide during the animation process. You can easily refer back to your storyboard at any stage, helping you maintain consistency and stay true to your original vision.
Sharper preproduction, less back-and-forth
Workflow tips and Boords product updates for video and brand teams, twice a week.
More from the blog


Storyboard software for video agencies & brand teams
One workspace for storyboards, animatics, comments, and approvals.
Spend time on the creative, not the back-and-forth.


Storyboard Activity
Sarah changed the status of Explainer Video v3 to Approved
8 JulSarah viewed Explainer Video v3
8 JulTom shared Explainer Video v3 with sarah@beacon.co, dev@beacon.co
7 JulTom changed the status of Explainer Video v3 to Review Needed
7 JulTom created Explainer Video v3, a new version of Explainer Video v2
7 JulAmara marked a comment on Explainer Video v2 as complete
7 JulDev commented on Explainer Video v2 - Frame 4
6 JulStoryboard Activity
Sarah changed the status of Explainer Video v3 to Approved
8 JulSarah viewed Explainer Video v3
8 JulTom shared Explainer Video v3 with sarah@beacon.co, dev@beacon.co
7 JulTom changed the status of Explainer Video v3 to Review Needed
7 JulTom created Explainer Video v3, a new version of Explainer Video v2
7 JulAmara marked a comment on Explainer Video v2 as complete
7 JulDev commented on Explainer Video v2 - Frame 4
6 Jul